Welcome to our laundry room!
We hung the shower curtain rod from Bailey's bathroom since we're renovating hers in a couple weeks to use as a drying rack. It's a great fix for not having to drill into the wall or the brand new cabinet!
You may remember that stain guide from a previous laundry room post :)
I decided I didn't like the wood tone against the yellow so I took the glass, guide and backing out of the frame, gave it a couple coats of white spray paint and put it back together.
I just used a simple nail to hang the dryer vent cleaner right next to the dryer. Keeping things by the things we use them for is one of the organizational tactics I strive to always use.
I am in love with out the laundry bags turned out! Below you'll find where I got the idea and the printable I created in PicMonkey to use for the iron on label!
The laundry bags hand nicely on single white hooks. I initially thought we'd mount the hooks to a small piece of wood but we just screwed them right into a stud and they haven't moved :)I keep this painted wooden crate I found at a yard sale in here as well to hold Bailey's outside equipment. Eventually this stuff will go in the garage (minus her sandals).
Here is one of the projects that haven't been finished. We decided to replace the dog door in here because the other one was really gross and apparently the size of the frame has changed since the previous owners bought the older dog door...hence the black dish towel shoved in there. We are probably going to replace the door because we also have to replace the weather stripping too.
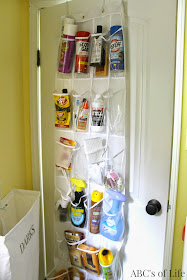
On the back of the door, I hung a cheap over-the-door shoe rack to hold cleaning supplies. While this really works well, we are trying to start using up all the chemical based cleaners and start using more DIY all natural cleaners. We're getting there...
And here was the biggest project! We removed the ugly shelf and installed this beautiful glass door cabinet. I LOVE IT!
Ahhh...organization :)
Inside the cabinet I tried to make things look as pretty as possible so we transferred our detergent to the drink dispenser (I kept the purple lid from one of the old detergent bottles to use until I find a cup to replace it with), transferred the baking soda, Cascade dish detergent, and Borax to glass containers that match the drink dispenser, and have a box on the top shelf that holds...
Lightbulbs! I just put a sheet of white tissue paper (from gift wrapping) in the bottom and sit the lightbulbs on top of it. We don't keep a huge stock of bulbs because we are gradually replacing as many as possible with the curly ones :) Although this box will be getting moved to the linen closet because I need a space for the iron...
How cute are these!!!!
So here's the breakdown and the links that go with them!
What we have done:
- Painted
- Removed the shelf, repainted and hung the cabinet
- Framed the stain guide, then repainted it
- DIY chalkboard labeled jars
- Bought the Ikea Bumerang hangers for hang dry clothes
- Bought the rug from our Mood Board
- Bought and put the new cover (from Home Goods) on the ironing board
- Hung the ironing board on the Young House Love hooks from Target
- Hung the dryer vent cleaner (from Home Goods)
- Created the Light/Dark Laundry bags from THIS post at The Pin Junkie
- Put the light bulbs in a photo box from Michaels with tissue paper
- Repurposed the shower curtain rod to the hang dry rod
- Hung the fly swatters
Here is what we have left to do:
- Move the lightbulb box and put the iron there
- Fix the dog door/Replace the door
- Move Bailey's toys to the garage
- Find a cup for the detergent
- Use up the cleaners
As you can see we are mostly done and I am so happy with the outcome! Here is the printable I promised for the laundry bags. I used Jolee's iron on transfer paper and just followed the directions on the package :)
I hope you enjoyed this laundry room tour, and as always, thanks for stopping by!


No comments:
Post a Comment